Growing Blog
How To Grow Mushrooms On Logs And Stumps With Plug Spawn

Growing mushrooms on logs is a fun and low maintenance way to enjoy fresh mushrooms at home. Even if you only have a small backyard, log-grown mushrooms can be a fun and fruitful addition to your urban landscape.
Any hardwood loving species can be grown on logs. That includes Shiitake, Oysters, Reishi, and even Lion’s Mane.
Although log cultivation doesn’t have the same predictability as indoor grown mushrooms, the process to grow them is much more laid back and maintenance free. It involves first “inoculating” hardwood logs with mushroom mycelium, and then allowing the log to naturally colonize over a period of 6-9 months.
When the logs are fully colonized- and the weather conditions are right- the mushrooms will emerge from the log and can be harvested and enjoyed.
1. Making Mushroom Plugs
The first step to growing mushrooms on logs is to inoculate it with mushroom mycelium- and the best way to do that is by using fully colonized mushroom plugs.
You can buy pre-made mushroom plugs from various vendors online. If you haven’t grown before, or are just getting into the hobby, then buying plugs is definitely the best place to start.
However, making your own mushroom plug spawn is actually pretty easy, and worth it if you have a little experience and want to try to complete the whole process from scratch.
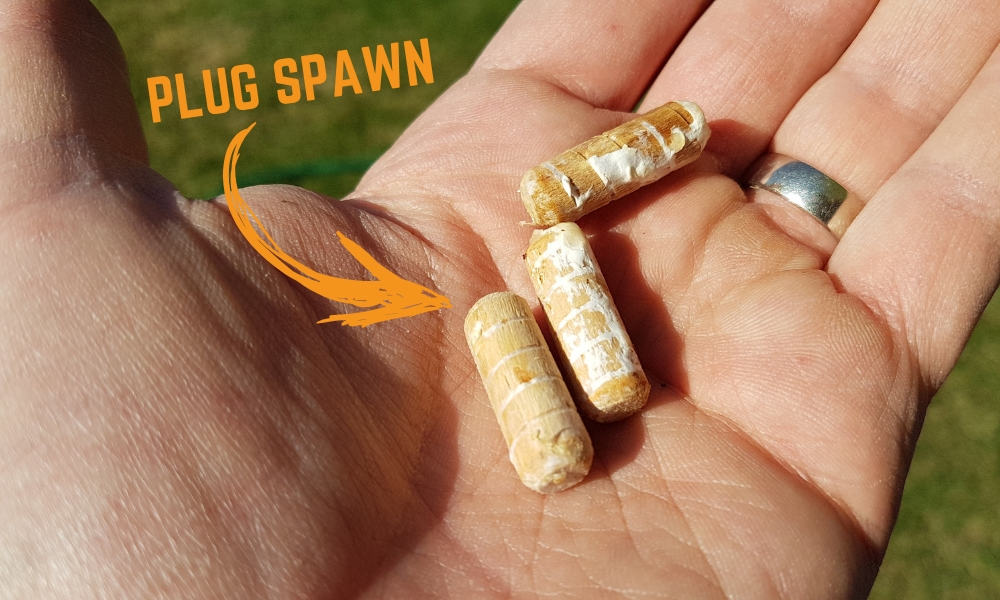
What is plug spawn?
Mushroom plug spawn- also known as dowel spawn or simply “mushroom plugs”– are hardwood dowels that have been inoculated and colonized with mushroom mycelium.
The plugs are used to inoculate hardwood logs and stumps for the purpose of growing mushrooms outside.
Although typically used for growing Shiitake on logs, mushroom plugs can also be used to successfully inoculate any hardwood loving species- including Lion’s Mane mushroom, Reishi, and all types of Oysters.
Why Use Mushroom Plugs?
There are many different ways to inoculate logs for growing mushrooms, all with varying levels of difficulty and predictability.
These methods include everything from sandwiching sawdust spawn between layers in tree stumps, to cutting wounds into a log or stump with a chainsaw blade covered in “spore oil.”
Using properly made mushroom plugs is both easy to do and relatively reliable.
How To Make Plug Spawn
The process of making mushroom plugs at home is very similar to making first generation grain spawn. The only major difference is that you’ll use hardwood dowels instead of sterilized grain.
Equipment Needed
1. Spiral Wound Hardwood Dowels (3/8” inch)
These can usually be found at hardware stores or craft shops. You can also find them on Amazon, or online mushroom equipment vendors. Of course, non-spiral wound dowels will still work, but the grooves in the spiral wound dowels help the mycelium get a tenacious grip on the wood.
2. Mason Jars With Modified Lids
These are the same type of jars that you would use for making first generation grain spawn. The lid should be modified with a filter patch or wad of pillow stuffing so that the mycelium can breathe.
3. Mushroom Culture
Of course, in order to inoculate the plugs, you’ll need some type of mushroom culture. Suitable species are Oysters, Lion’s Mane, Shiitake and Reishi.
You can use grain spawn, wedges of mycelium on agar, or even liquid culture syringes.
4. Pressure Cooker
You’ll need a pressure cooker to sterilize the dowels before you inoculate with culture. Since they are just pure hardwood, you can probably just get away with boiling the dowels or soaking them in hot water, but if you do have a pressure cooker it’s always better to play it safe with potential contamination.
Mushroom Plugs – Step By Step
Let’s walk through the process of making your very own plug spawn step by step.
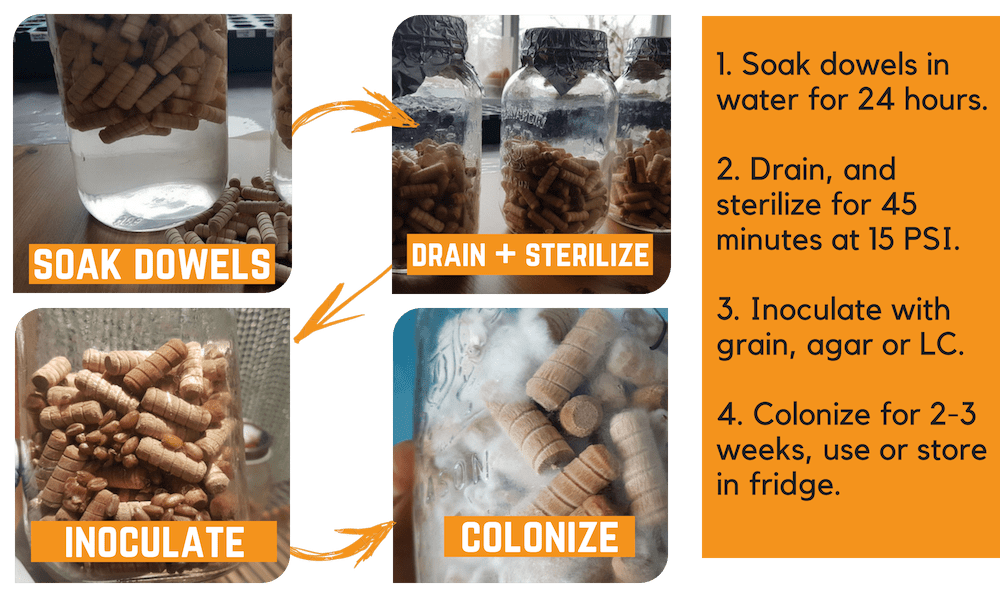
Step 1: Soak Plugs for 24 hours
Soak the dowels in clean water for about 24 hours. Soaking for a day allows the dowels to soak up the right amount of moisture required for colonization.
I like to use enough dowels so that each mason jar is about 1/2-3/4 full. The dowels float, so make sure they are all submerged in water while soaking.
I like to soak them in the mason jar by filling water all the way to the top, and closing the lid. The neck of the mason jar seems to keep all the dowels submerged.
Step 2: Drain and Sterilize
After a 24 hour soak, the dowels should be sufficiently hydrated.
Drain out the excess water, and close the jar with a breathable lid. The easiest way to do this is to drill a ¼” hole in the lid, and pull through a wad of pillow stuffing to act as a filter. Cover the lid in tinfoil and sterilize at 15 PSI for 30-45 minutes.
Since the plugs are made of plain hardwood, you really shouldn’t need to sterilize. There isn’t enough nutrition in the hardwood to cause an issue and you could probably get away with simply boiling them in a pot or even soaking them in hot water.
That being said, if you do have a pressure cooker, it’s always best to err on the side of caution, since contamination could quickly ruin your spawn if it does take hold.
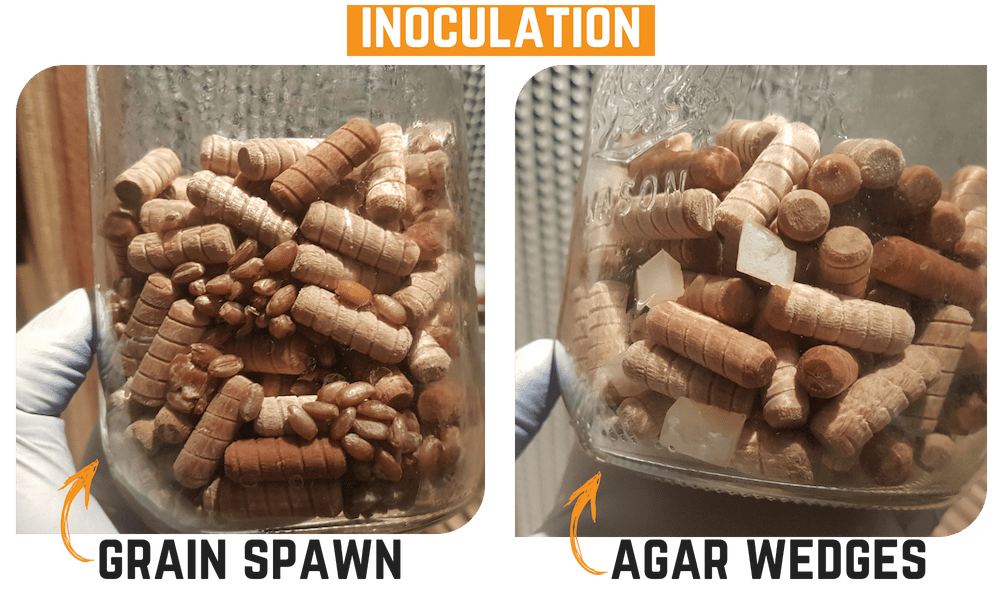
Step 3: Inoculate Plugs
Once sterilized and cooled, the plugs can be inoculated with mushroom culture using either grain spawn, agar wedges or liquid culture.
Option 1: Using Grain Spawn
Personally, I think grain spawn inoculation is the best method for making dowel spawn. You will get more inoculation points than you would with agar, and it will therefore colonize much faster.
Using the sterile procedure, open the jar of sterilized dowels, and quickly drop in about 1-2 tbsps of grain spawn.
It’s usually easiest to do this with a small mason jar of grain spawn rather than a large bag.
This procedure should be done in front of a laminar flow hood, but you can also easily get away with using a simple “Still Air Box” (SAB).
Option 2: Using Agar Wedges
Using agar to inoculate dowel spawn follows the exact same procedure as making first generation grain spawn. Simply open the lid in a clean environment and drop in 3-4 small wedges of mycelium.
Again, this will colonize slower than if grain spawn is used. There is also the annoying possibility that the agar wedges stick to the side of the jar and have a hard time jumping off the wedge into the dowels.
Option 3: Using Liquid Culture
Liquid culture can also be used to inoculate dowel spawn. LC’s of various species can be found easily from online sellers for relatively cheap (Usually $10-15 for a 10 ml syringe).
You can inoculate the dowels by opening the lid and squirting in 1-2 CC liquid culture into each jar.
You can even make “ self healing injection ports” so that you don’t need a flow hood or a SAB. This is done by drilling an additional small hole in the lid (⅛”) and filling with high temperature silicon. You can then sterilize the needle tip with a flame and inject the culture directly through the silicone, without having to worry about exposing the dowels to ambient air.
The disadvantage of liquid culture is that it will collect at the bottom of the mason jar. Try to avoid this by squirting the culture straight down on top of the dowels- don’t squirt directly at the inside wall of the jar.

Step 4: Colonize, Then Use or Store
Once inoculated, simply place the jar on a shelf away from direct sunlight. The mycelium will start to crawl across the dowels, and should be fully colonized in 2-3 weeks (depending on the species.)
If you’re not ready to use the dowels as soon as they are colonized, the jars should be placed in the fridge where they can last several months before being used.
Buying Plug Spawn
As mentioned before, you don’t have to worry about making your own plug spawn if you don’t want to.
There are plenty of good suppliers online that will happily send you fully colonized, ready to use dowel spawn.
2. Growing Mushrooms On Logs
Growing mushrooms on logs is a low-tech and low maintenance way to have fresh mushrooms in your backyard for years to come.
Once you have plug spawn, the process of log cultivation is actually pretty straight forward.
What You’ll Need
1. Hardwood Logs
Many types of hardwood will work, including aspen, birch, poplar, oak, maple etc. In general, avoid softwoods (spruce, pine, fir) and fruit trees. Different species of trees will work better for different species of mushrooms.
2. Plug Spawn
Homemade (as shown above) or purchased. 3/8″ dowel spawn works best.
3. Adequately Sized Bit
Any power drill with a suitably sized wood bit. You want a TIGHT fit between the dowel and the log.
4. Hammer
This is for pounding in the dowels. They will be too tight to push in by hand.
5. Paraffin Wax (or Bees Wax)
Wax is needed to protect the inoculation points from drying out before the mycelium gets a chance to grow.
Step 1: Harvest or Gather Logs
First, you’ll need to find a log suitable for the mushroom species you want to grow. There are varying opinions on what logs are best, but as long as you don’t use softwoods (spruce, pine, fir) or fruit trees (apple trees, cherry etc.) you should have some success.
Good choices for mushroom logs are hardwoods like Aspen, Maple, Beech, Oak, Poplar or Birch, and what’s best for you will depend on what grows naturally in your area.
Look for logs between 4-8” thick, and chop them to about 4 ft long.
The logs can really be harvested anytime- although it’s often recommended to chop down the log in the fall or spring, when temperatures are below freezing at night and above freezing in the day.
Step 2: Soak Logs
This is not 100% necessary, but it does seem to help. The logs should be soaked in water for a week or so, in order to become more suitable for colonization.
You can do this by floating the logs in a lake or pond, or by simply staking them in the yard and soaking them with a hose. You can wrap them in burlap to ensure they do not dry out too fast.
Step 3: Drill Holes
Drill holes all over the log, approximately 4” apart. Some people form a “diamond” pattern, but to be honest, I don’t think that the pattern of the logs really matters- as long as there is a suitable number of holes.
Use a drill bit that is nearly the same size as your dowel, so that you’ll get a nice tight fit with the mushroom plug. Holes should be about 1-¼” deep, or just deep enough to fully take in the plug. Do as best you can to clear the remaining sawdust and woodchips from the holes to make room for the plugs.
This can be time consuming, and much more comfortable if you can get some saw-horses or a table to keep the logs off the ground.
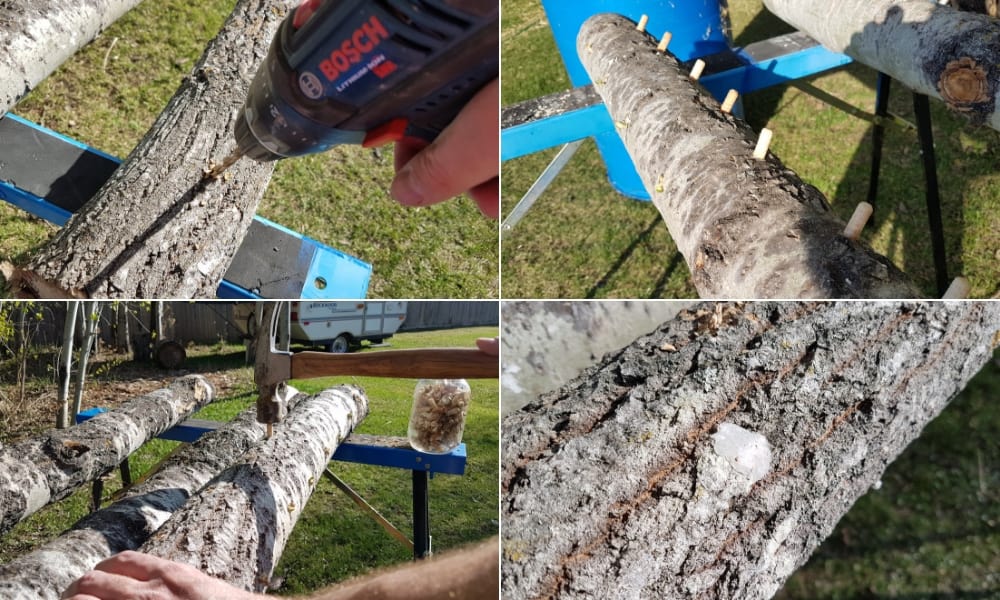
Step 4: Inoculate the Log
Inoculate the log by pounding the dowels into the holes.
They should be too tight to push in by hand, but can be gently pounded in with a hammer or mallet.
This part of the process is down-right satisfying to do!
Step 5: Wax Over Plugs
In order to prevent the plugs from drying out, you need to cover the freshly inoculated holes with wax.
Paraffin wax or beeswax both work great. Heat the wax until it’s malleable enough to spread, and then place a fair sized glob over the hole.
Use a spreading tool so not to burn your fingers!
Some growers also like to cover the top and bottom of the log with wax to prevent moisture loss, but I am not sure if this is necessary.
Step 6: Wait For Mushrooms
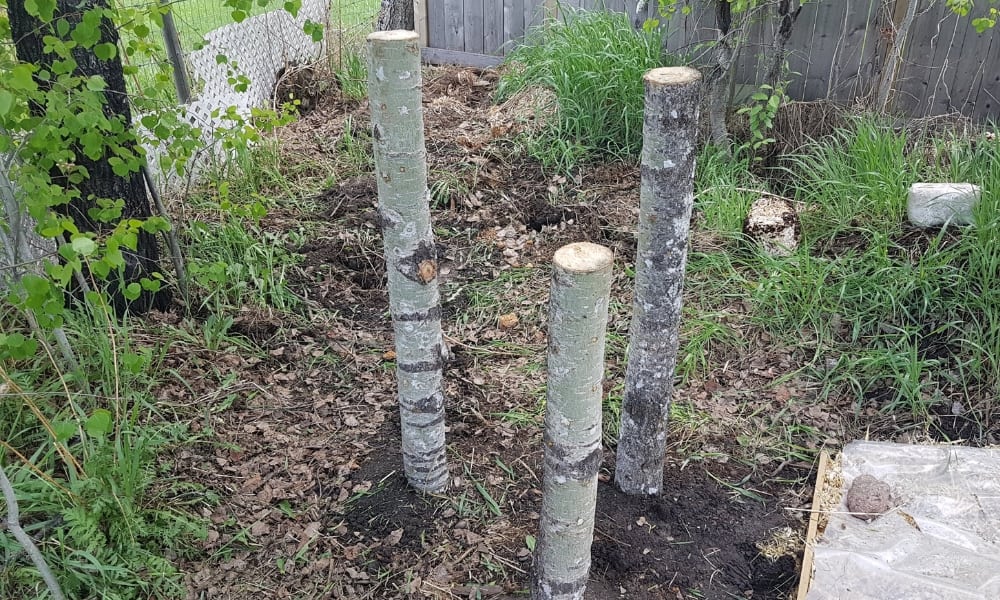
Once inoculated, place the logs in a shady spot so they can colonize.
Shade cloth can work well for this, but if you have a suitable location, feel free to just lay them down in the forest. You can even dig a small hole in the ground and stand your logs up.
The important part is that they don’t get blasted with direct sunlight, and stay relatively moist.
Check your logs often, and don’t be afraid to set the sprinkler on them every once in a while.
Alternatively, you can also just stack them up and cover them in burlap as they colonize.
How long until the mushrooms show up?
If your logs were properly inoculated with plugs from a trusted source, then it is relatively unlikely that another species will grow in its place.
That being said, it is definitely possible that another type of mushroom, even a deadly poisonous one such as Galerina marginata, could fruit instead.
For this reason, it is important to be able to properly identify any mushroom that you harvest from your logs. A good rule of thumb is if you aren’t sure, then it’s not worth the risk.
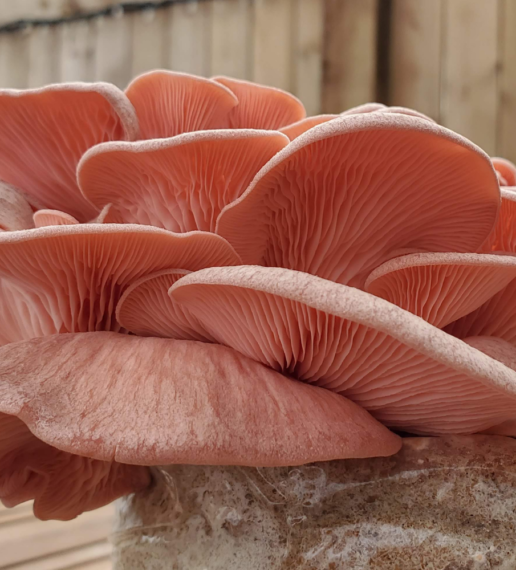
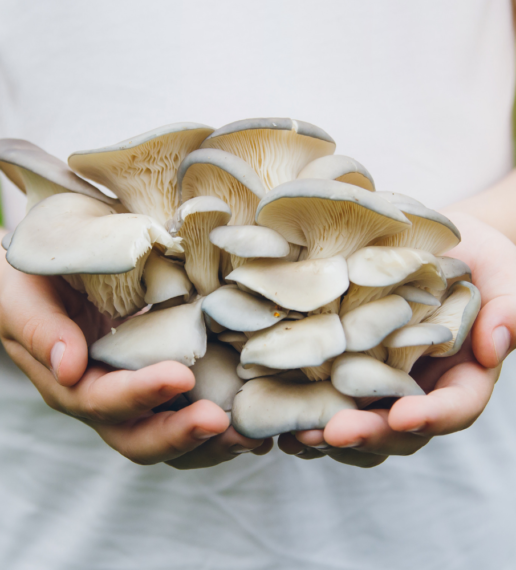
But don’t let that scare you! Shiitake, Oyster and Lion’s Mane and Reishi are all relatively distinct- especially if you know what to expect.
Other Ways to Inoculate Logs
Of course, there are many other ways to inoculate logs for growing outside. If you don’t have plugs, you can simply use sawdust spawn, and cram it into the holes. This is a little more work, and isn’t nearly as successful in general- but it can definitely work.
For stumps, another common method is to stack “slices” of the log, with sawdust spawn sandwiched in between each layer. You can then connect the slices of logs together with another piece of wood or other fastener.

Growing Pink Oyster Mushrooms At Home (Easy Backyard Grow)
Pink Oysters mushrooms are one of the easiest species to grow. They are fast to colonize, produce a ton of fruits and aren’t at all afraid of less than perfect conditions. I just recently finished a fun backyard grow, and wanted to share how easy it is to produce a fresh bounty of one of
7 Tips for Beginner Mushroom Growers
New to growing mushrooms? If so, you may just be a little mystified – which is totally understandable. There is a ton of information to try and digest and make sense of. Terms like inoculation, agar transfers, laminar flow- what does all of this mean? And what of all this do I really need to know? I just want
Can trees that are dying from oak bore be used for mushroom growing, The reason I ask, is on my farm in the middle of Mo. we are having quite a few white oak trees getting these bore,s and killing the trees and I was wondering if these can be put to use instead of firewood.
Hey there! Probably, but I haven’t tried that specifically. It is always worth a shot!
About how long until they begin to fruit, should you follow your instructions above? I know it depends on the mushroom, but some sources have told me over a year! Is that accurate?
Hey Jennnifer! You are right, it depends on species and location…. but yes, I can take up to a year, or could be as early as 4-6 months (ie inoculate early in the spring, fruit late in the fall.)
Can it stay outside during the winter if harvested in the fall, and if so will it continue to produce the next spring fall season?
Hello,
What do you do with the logs after they can no longer be harvested? I understand they can flush regularly for years, but eventually the nutrition must be used up. What then?
I’m writing an article on mushroom substrates, and part of the assignment is to cover any possible uses for used substrate.
Thanks!
You could simply compost them, use as firewood, ect. You could even chip it up and use it as mulch!
Use a solution oh honey and water, 1/4 to 100ml of water…I soak my work logs into a scaled up solution of the above mentioned solution before plugging them. The honey has to be all natural. It provides an essential sugar did the mycelium will use and eat or a nutrient so to speak for the mycelium to grow.
Can you use your spent logs to inoculate fresh logs? In other words, there a self reliant way to keep refreshing your stock without the outside imput of fresh spore or spawn?
Yea. Take some mushrooms that grow and make a culture from them! Many ways to do so
Cool thanks for the info!!
Thanks for checking it out!!
I have been reading left and right. It’s so overwhelming. How old can the log be? Once i finished it and i am at the point of storing it, how cold can it get? Should i wait until spring? We have a TON of leaves in the yard from our oak trees, Would it be okay to place the log in a shade space close to the house, and cover it in a ton of leaf, in case it freezes? And if it freezes, will the log be okay?
Thank you for taking the time to write these instructions! They are by far the simplest yet!
No older than a month. Few weeks old is better. But best is fresh. If older than 10 days it will need a 24 hour soak after inoculating. Cold doesn’t matter for shiitake. They are used to it. Snow will actually keep them moist during winter so cover with snow ir possible. Leaves I dont know about, mine are about 5 feet from my house using it as partial shade with a huge oak tree in my yard. That’s all I know.
Mushrooms are nature’s Way of helping to decompose organic substances. You can add wood chips or any other organic material to keep them growing. I use a honey water solution to feed the mycelium but not too much honey cuz honey can kill my psyllium about 1/4 honey teaspoon to 100 of water; just scale it up.
Hi,
Thanks for this article very informative. I was wondering why is it that 3/8 ” is ideal for the dowel diameter as opposed to a smaller or larger diameter. What would be cheapest and most easily available to me would 1/4″ inch dowels. I suspect it would work as well but I was just curious why 3/8″ is best. Thank you!
Is this process applicable in the tropical region like Southeast Asia?
I’m being given a bunch of oyster mushroom plugs. How important is it that the logs have bark? I just got 4-foot logs from a neighbor who was cutting down an elm tree. Nice size, but bark came off when the tree guys did their thing. Can I use these? Alternatively, can I plant plugs in a shady garden bed of straw?
Also, can I use candle wax (Gulf Wax like I get at grocery store) to seal the holes?
Hi, could be a problem if the holes in the log were slightly bigger?
We were able to insert the plugs by hand, no hammer needed. I imagine now that probably the wax could avoid the plug to properly touch the wood. Am I correct?
Been watching Fresh Cap for a long time, and you’ve been a great influence on my ability to grow my mushrooms. Thanks for the great work and continue doing what you do. Mush Love.